Microstock:
The Ultimate Beginner's Guide

This updated guide will give you everything you need to succeed as a microstock beginner.

First, we'll show you the best microstock agencies to join. Then, you'll learn how to shoot images for microstock that will sell.

Next up you will learn how to avoid the dreaded rejections and actually get your images accepted the first time.

Fourth, it's time to score valuable tips & tricks for keywording your images for stock. Finally, your photos & vectors will be uploaded and put up for sale.

All this and more in the ultimate guide for getting started in microstock. Let's get started…

Various photographic items on shelves as the hero image for Microstock: The Ultimate Beginners Guide

Chapter 1:
How To Find The Best Microstock Agencies

Every microstock contributor starts somewhere. And that somewhere is here – finding and joining the best microstock agencies.

In the first chapter of this microstock guide, I'll show you loads of great stock agencies and where to find them.

Plus, I'll explain what to look for when choosing other microstock agencies.

Mouse pointer choosing a stock agency on a computer for the How To Find The Best Microstock Agencies section of the Ultimate Beginner's Guide to Microstock

What Is A Microstock Agency?

As described in detail in our What is Microstock? article, microstock is easy to understand if you break it down. Micro is simply a term describing small (or micro) payments for images that are already part of a collection (or in other words, are in stock). Put the two together and you have microstock.

A microstock agency is the middle man between you, the creator, and the buyer of the image. It's the agencies shelf that the image sits on, so to speak.

Does It Matter Which Agency I Use?

Yes.

Some will earn you a LOT more than others. Some agencies are harder to get into than others. And then some appear and then shut down seemingly overnight.

So you may want to be a little selective of where you put your precious stock photos, vectors or videos.

Shutterstock logo

Choose reputable agencies with a good track record, such as Shutterstock.

What Are The Best Microstock Agencies?

The best microstock agencies for contributors are the ones that actually earn you an income, and are likely to be around for the long haul.

Our top picks for beginners in microstock are:

There are of course many, many other decent agencies out there. You may want to see our comprehensive microstock agency list to see more options.

Earnings breakdown screenshot from the best microstock agencies

The split of agency earnings in a recent month. You don't want to miss out on those big earners!

Should I Join Right Now?

It’s entirely up to you when, or if, you choose to sign up with any agency. But I'd say go for it!

Signing up also usually allows you access to the agency’s contributor forum, where you can get help from others about how to get succeed. These forums are invaluable and you should consider regularly reading through them once you have joined. That way you can learn from others and keep abreast of the latest news.

Pro Tip

Give some thought to what username you will sign up with. It is better to look professional right from the start, rather than have potential buyers put off by a poorly chosen profile name!

What About Going Exclusive?

Be careful in signing up that you don’t choose to be an exclusive contributor, unless you have given it some serious thought. We have a blog post that explains the pro’s and con’s of being an exclusive contributor in more detail.

To summarise it briefly, being exclusive means your images can only be for sale on that one agency. Years ago this was a good move on certain sites, but not so anymore. Being independent means you don’t have all your eggs in one basket if things go bad.

Plus with new agencies starting up all the time you have the flexibility of trying them if you wish.

In short, don't go exclusive.

Will I Still Own My Images?

Each site will have a different Contributor’s Agreement that you should read if you are concerned in any way.  Essentially most of them state the same fundamentals:

  • You will ALWAYS keep copyright of the images (unless you specifically elect to sell it on individual files – Dreamstime offers this on a per-file basis)
  • Your images cannot be used in a defamatory way
  • You agree to their sales and royalty structure
  • The agency has the right to use your images for promotional purposes
  • The agency can change their contract terms as they see fit

Some microstock agency’s agreements also state that you agree to keep images for sale on that site for a period of “X months”, usually 6 months or so.

But again, if you are concerned, be sure to read the fine print.

Now, you're all signed up and good to go. On to Chapter 2 then!

Chapter 2:
How To Shoot Great Images For Stock

Not every photo, graphic or video is right for stock.

Some may upload a few thousand images and get a handful of sales. Others have portfolio’s numbering only in the hundreds, yet they earn their entire income from it.

The trick is to know how to shoot images that will sell as stock.

With my tips, you'll be able to turn images into sales.

That's the point of chapter 2 of our microstock guide…

Camera with various subject matter for the How To Shoot Great Images For Stock section of the Ultimate Beginner's Guide to Microstock

What Kind Of Images Sell Well?

You’ve probably got a few hundred or even thousand images sitting on your computer and you’re wondering where to begin – do I submit them all?  How do I choose?  Which kind of images will sell as microstock photography? The first step in the process is the kind of images that you should submit as microstock. You might also want to check out what kind of camera gear is best for stock photography.

Let's break this up into helpful sections for photographers, vector artists and finally videographers. After all, it is the DEFINITIVE microstock guide, right?

Photography

Let's start with photography first of all.

What Kind Of Photos Sell Well?

In general, the following list includes the kind of photos that most libraries will readily accept:

  • Medical concepts – doctors, patients, nurses, aged care etc
  • Food and Drink – restaurant quality food, as well as your local fish and chips
  • People – in action, at work, relaxing, mealtimes, families, etc
  • Industry – everything from agriculture to mining
  • Emotions – images capturing feelings
  • Business – corporate, executive, handshakes, charts etc (but be creative)
  • Isolated objects – again, try to be creative (there are 100,000,000 isolated apple shots out there…)
  • Sports – concepts, players, movement, kids, etc
  • High quality nature – if landscapes are your forte there is still room for the best of the best (of the best).
  • Wildlife – rare, endangered, close up, in action etc
  • Editorial – good quality editorial photos

High quality nature and wildlife photos are still in demand.

Pro Tip

Some of the buzz keywords and concepts in stock photography at the moment are ‘authentic' looking photos, as well as diversity (think race, gender, ages, etc.)

What Kind Of Photos DO NOT Sell Well?

Most agencies will tell you to avoid submitting these types of images…

  • Travel snaps – happy snaps of you on the beach aren’t in high demand strangely enough
  • Sunsets & clouds – lots of pretty colours, but little sales potential
  • Flowers – anyone can do it, and everyone has
  • Pets – sometimes they’re only cute to you
  • Photoshop filters – anything that uses a basic filter easily found in Photoshop or the like

Bear in mind that these are general guidelines and not hard and fast rules.  For instance, I have had considerable success with travel and nature related images.  But in the end your time will probably be better spent shooting images that fit within the first group listed above.

Vector Illustration

Ok all you vector artists out there, ready to find out what to create?

What Kind Of Vectors Sell Well?

In general, the following list includes the kind of vectors that most libraries will readily accept and sell:

  • Flat Design – simple, but deceptively well designed graphics in the flat design style
  • Icon Sets – in all range of styles
  • Product Mock-ups – easy ways for buyers to showcase a logo or design on a product
  • Seamless Backgrounds – funky backgrounds that can be repeated seamlessly

Vectors don't necessarily have to be elaborate, but they do need a clear concept and design.

What Kind Of Vectors DO NOT Sell Well?

Most agencies will tell you to avoid submitting these types of vectors…

  • Auto Trace – photos that you have auto traced and then converted
  • 1990's Clipart – times have changed people, move on
  • Overly Simple – remember, people are buying these so put some effort in!
Pro Tip

Vectors are always in demand, so if you're a vector artist with some unique ideas, you'll probably do really well with stock vectors! Just be careful to find your style, rather than copy others.

Video Footage

Stock video footage is huge these days. If you know how to shoot compelling video footage, then you should do well with microstock.

What Kind Of Video Footage Sells Well?

In general, the following list includes the kind of video footage that most libraries will readily accept and sell:

  • Drone Footage – those amazing overhead shots are in huge demand
  • People – authentic looking shots of people in all sorts of situations
  • Footage With Camera Movements – footage shot using a slider or some technique that allows for smooth camera movements

What Kind Of Video Footage DOES NOT Sell Well?

Most agencies will tell you to avoid submitting these types of videos…

  • Static Shots – lockdown shots that have little interest
  • Converted Film – there is a market for it on certain sites, but in general crisp digital footage is what they want
  • Shaky Shots – you're competing with professionals, so make sure there is no shake or unintended movements
  • Ambient Noise – footage that still has ambient noise included that doesn't match the clip eg: people talking when the shot is of nature
Pro Tip

Shoot your footage in the highest possible resolution, as the higher the resolution often the more it sells for. 4K has become the new sought after resolution.

Chapter 3:
How To Avoid Rejections & Get Approvals

How good are you at taking criticism?

No matter what your skill level, microstock WILL test your humility. Sometimes your favourite image will be rejected for reasons that seem to make no sense to you whatsoever.

But there are steps you can take to limit how many times you will sit staring in disbelief at your latest batch of image reviews.

With our pro tips in chapter 3 of the microstock guide, you can avoid unnecessary rejections and start getting those images approved!

Reviewed images with 3 out of 4 approved for the How to avoid rejections and get approvals section of the Ultimate Beginner's Guide to Microstock

Should I Submit Older Images?

Yes.

Just because up until now you haven’t photographed any doctors working on the elderly (or some other concept of high commercial value), doesn’t mean that your existing images aren’t worth thinking about.

Some images online are better than no images online.  So look through all your old files and pick the best of the best, the ones with real potential, nice lighting and in sharp focus. And then put them aside to fine tune to the point of getting your first submission ready to go online.

What Are The Top Rejection Reasons?

It seems each microstock site is particularly fussy about one or two things, while another might let them slide.  But across the board, some problems will always get your images rejected.  The top things to look for in your files are:

Noise

Just like film grain of old, noise is your camera struggling to make sense of the scene it has captured.  This exhibits itself in often oddly coloured pixels (purple, green) in darker areas of the image, particularly at large sizes or in low light.  It looks dirty and unprofessional.  Be very conscious of it. Use noise reduction software (such as found in Adobe Photoshop or Lightroom) and shoot RAW if possible to limit its affects.

Poor lighting

Look for distracting shadows, blown out highlights, dirty blacks, colour casts from different light sources and anything else that detracts from a clean looking image.

Screenshot of stock images that were rejected by Depositphotos

Some batches have more success than others, as you can see in this screenshot from a Depositphotos submission.

Composition

A good stock image is sometimes tricky to get your head around.  If it’s an object on white, then don’t leave too much white around it as then buyers need a bigger size image which annoys them.  But if it’s a portrait or a complex still life perhaps, then leave some room where a designer can add text over the image without it wrecking the shot.  Always try to follow one of the major rules of composition, such as Rule of Thirds of something similar.

No Commercial Value

This one is pretty subjective, and probably the main cause of complaint from photographers. Microstock agencies want images they can sell, not just any old image that is technically sound. So make sure the images you submit have a clear message, concept, purpose or use and are the kind of image that a designer could incorporate into a design or use to illustrate a concept.

Pro Tip

Rejections are inevitable. Rather than get upset, objectively think if the reason was legitimate and if you can fix the problem quickly. If not, learn the lesson and move on to another image.

Can I Enhance Images In Photoshop or Lightroom?

Absolutely! In fact, not only are you allowed to do it, you are encouraged to do so to a reasonable degree.

If you don't already have it, I highly recommend the Adobe CC Photography plan for photographers. You get Lightroom & Photoshop for $10 a month, plus some other goodies. Money well spent.

Even better, if you are a student or a teacher, you can access the entire Adobe CC Suite at 60% off!

Why do you need it? Because no file straight out of the camera is absolutely perfect. Most will lack contrast or saturation or need a dust spot removed. So fire up your image editing program and fine tune your photo to the best possible result.

But be careful – you don’t want to overdo it and ruin the image. Too much editing can cause noticeable artefacts in the photo that will get it rejected. Also, you don’t want to spend too much time working on each image, as you won’t be able to make back your time quickly with microstock earnings.

So the best bet is to perfect a workflow that is good for you and your images. You can learn some valuable skills by viewing quality tutorials such as these:

Chapter 4:
How To Become A Keyword Master

Keywords. Metadata. Tags.

What are we talking about? Basically, the details that will get your image found in a search.

That's right, these seemingly boring details are the key to getting sales.

If you keyword well, you'll have a huge advantage over the competition.

Chapter 4 of our microstock guide is essential to your success…

A golden key fitting a particular space for the How to become a keyword master section of the Ultimate Beginner's Guide to Microstock

What Is Keywording For?

Simple answer: It’s how a buyer finds your photo amongst millions of other photos.

When a buyer goes to a microstock site and wants an image of a Kangaroo for instance, they can’t spend hours trawling through random of images of other animals.  So instead of just looking in the ‘Animals’ category they will search for the keyword ‘kangaroo’ and then get a much better set of images to choose from.

So let’s say you’ve got an awesome image that you know will sell.  If you leave out the most likely keywords that a buyer will search for, then you may as well have taken the world’s worst photo, because no one will find it.  Thus no one will buy it.

Good keywording equals good sales.

What would you search for if you wanted an image like this?

How Do I Add Keywords & Descriptions To An Image?

All microstock sites require you to submit your images in JPG format, the most standard compressed picture format around.  This file type (like most others, but not all) can also hold reams of additional data that you may not have known even existed in your photos.

If you use Adobe Photoshop, the way to access this is by going File > File Info.  Here you’ll be presented with a wealth of information that tells you everything from what aperture you used to take the photo, or even the GPS location of where it was taken!

But the ‘Description’ tab is what we are really interested in.  Here you will want to fill in 3 fields of data: “Document Title”, “Description” and “Keywords”.

Screenshot of keywording in Adobe Photoshop CC

If you use Adobe Lightroom, you can find the same information while you're on the Library Module, and then look for the Metadata Panel, probably on the right hand side.

Screenshot of keywording stock images in Adobe Lightroom CC

Document Title

This is what your picture will be called, and sometimes, what it will show up as on microstock sites.  Some stock agencies use this field in their search algorithm, so it is important to use a relevant, succinct title that will help your file be found.

From my personal experience I have concluded that sometimes more generic titles are better. For instance, instead of using the technical Latin name for an animal, try the common form instead. Eg: Kangaroo and Joey

Description

A brief description of what your image contains.  Think logically – include main colours, man/woman, where they are, country, object, proper name (for plants & animals), what concept it represents (eg: “love” or “time flies”).

More frequently now this field is used by microstock agencies to help with searching, so check your spelling, be accurate and relatively brief – no novels.  Eg: For my “Kangaroo with Joey” image, the description is “Australian kangaroo with a joey in its pouch at sunset in the wild”.

Keywords

Here is where you can enter up to 50 keywords that are relevant to your photo. You can enter more, but most sites accept 50 as their maximum.

Don’t feel the need to use all 50, some find that around 30 is the sweet spot for most agencies.

Pro Tip

Try and think like a buyer. What would they search for? What words or phrases would they use?

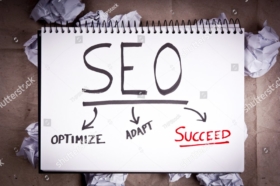
Are there good and bad keywords?

Absolutely!

Remember, the more accurate your keywording, the better chance you have of making some money from your your photographs.

There are some handy tools out there to help with keywording images. They can grab keywords that others have used from similar images to yours and help you build your keyword list. They can be a good place to start, but of course you will want to ensure they are accurate for your particular image.

Here are some basic things to think about when selecting keywords for your image:

Good keywords

Think about adding keywords that describe the main objects, colours, concepts, feelings, lighting, people, proper names for plants & animals, location, etc.  Basically anything relevant to the image that a buyer would search for.

Also use terms that are relevant to today. For example, terms like “selfy” or #metoo (minus the #) that are modern and relevant to what people may be looking for – as long as they directly relate to your image.

Bad keywords

Do not get out your thesaurus and add anything you find.

Buyers will search for ‘man’, not ‘chap’ or ‘fellow’.  Never include your camera brand, your own name, or keywords that have no relevance to your image.  In some cases, less is more with keywording (as long as you have a minimum of about 10-15) as lots of irrelevant keywords will just dilute your image showing up in search results.

Ok so you’ve slogged it out and added all those pesky keywords to your amazing images.  Keywording complete! Now comes the last part – actually getting them onto the stock library’s web sites.

Let's get you uploading in the final chapter…

Chapter 5:
How To Upload & Start Selling

If you’ve made it to this point with all of your images, then a big congratulations is due!

The hard work will soon pay off.

Our final section of the microstock guide may seem like a no-brainer, but reading it may save you some precious time.

After all, uploading hundreds of megabytes or even gigabytes of data can be time consuming.

Make sure you are doing it efficiently with these tips.

Various pictures coming out of a computer for the How to upload and start selling section of the Ultimate Beginner's Guide to Microstock

How Do I Upload Stock Images?

If this is your first submission, consider splitting the submission up into smaller lots – say 50 images per submission, or even less. That way, if you make any mistakes in the submission process, you wont get ALL your images rejected right away.

Now that you have a few smaller submissions ready in separate folders, get yourself a good FTP program.

Most people use FileZilla or Cyberduck (my choice for Mac) but it’s entirely up to you. FTP is the best way to upload many images at once, although all the sites do offer alternative methods such as Flash up-loaders or HTML5 up-loaders.  These tend to be slower, buggier and always more cumbersome when dealing with more than just a couple of images. If you are uploading video then FTP is your only choice.

There are also some programs designed to help microstock contributors with the upload process. You can find some on our Microstock Tools & Resources guide.

Once you have signed up with a microstock agency, they will provide you with the relevant login details needed for FTP upload.  Usually these are provided immediately.  Bookmark these in your FTP program so that for each future submission you make it’s simply a matter of drag and drop onto your FTP bookmark to upload hundreds of photos at once. Grab a coffee and watch those images upload!

My Images Are Uploaded, Now What?

Each site is different from this point on.

Some microstock agencies handle everything from this point on, like PhotoDune for instance. Some require only a few clicks to simply select your files from your agency’s upload section and then submit them for review, eg: Shutterstock, Dreamstime, Depositphotos for instance. Others need more of your input before they review them.

If you login to your user account on each site after uploading your files (give it some time, your images sometimes show up immediately, but can occasionally take a few hours) on certain sites you will find you need to select categories for each image.  These are simply content sections that your image best fits into.

You may also need to assign Model Releases (a signed legal document completed by both you and your models – you can download them from each microstock agency) and fix keywords if you have gone over the 50 keyword limit.

Generally speaking, after you have uploaded your images the process of submitting your files to each agency should take no more than 10-15 minutes per agency for around 20-30 images. Once you’re used to the process, you can speed through this part very quickly.

Pro Tip

Don't obsess over categories. Just pick the one or 2 that is the best fit in general for your image and move on. Time is precious!

Getting Images Reviewed

Once you have hit the ‘submit’ button for your precious photos, they enter a queue to be reviewed by the microstock agency.  Some agencies take minutes or hours, while usually you will be waiting days for your results.

Don’t sit there hitting refresh – go take more pictures or draw more vectors!

Learn from this process, as you will get images rejected. We all do. Sometimes the reasons are ridiculous, but mostly they are valid and will help you to improve your skills.

Most sites will not be too happy if you resubmit rejected images without a valid reason to do so.  Sometimes you can correct the problem that the reviewer saw in the file, and then you can resubmit along with a note (depending on the agency) as to why you are resubmitting.

Screenshot of some editorial images being approved at Shutterstock for the Getting Microstock Images Approved section of the Ultimate Beginner's Guide to Microstock

You will be notified of reviews and can check them in your account, such as here on Shutterstock.

My Images Were Approved!

Celebrate!  It’s a great feeling getting your work accepted by internationally renowned microstock agencies!

Once the back-slapping has subsided, you can check your files on nearly all the agencies’ sites to see how many views they are getting, as well as sales of course.  Don’t expect sales too quickly – it will take time.  But just think – with each image you get approved, the greater your chances are of selling your work.

On the best selling sites (Shutterstock, Dreamstime) it’s not uncommon to get sales in the first week of having your files online.

Once you see your work starting to get some sales, that’s when the motivation needed to start producing more work will kick in.  And with each new batch of images you submit, no doubt your skills will improve, as will your sales.

Need More Advice?

For an even deeper dive into microstock, check out these two great ebooks.

Get Started In Stock eBook
Brutally Honest Guide to Microstock Photography

Share Your Experiences!

We would love it if you could share your experiences in microstock for others to benefit from.

Do you have tips & tricks? Earnings reports? Agency advice?

Please share it below and thanks for reading our Ultimate Beginner's Guide to Microstock!

Stock Photo Search

15 replies
    • MicrostockMan
      MicrostockMan says:

      That will depend on each site and you would be wise to check each one if you are concerned.

      But as mentioned, in general you are giving the agency the freedom to sell your images and use them in marketing. You are never giving up your copyright unless you specifically enter into an agreement for that with an agency. And there may be a lock-in period. For example, you can't delete your images from the microstock site for 6 months.

      Hope that helps!

      Reply
  1. Joseph Arsenault Ruel
    Joseph Arsenault Ruel says:

    Hi there, thanks for this guide! Would love to see an updated version of this guide to include audio… How to keyword, and so on. Thanks!

    Reply
  2. Charles M
    Charles M says:

    Hi there, great article! I'd love to know how you deal with models / non models and location owners's contracts, image rights etc. Models are expansive but I don't see another way than paying people for them to accept their image being sold, that's totally understandable. And what about locations? how do you get access to an airport or an hospital? do you give them permission to use freely your images shot in their properties in order for them to let you shoot? many thanks in advance!

    Reply
    • MicrostockMan
      MicrostockMan says:

      Hey Charles,

      Good questions!

      I have steered mainly away from using models due to some of the complexities involved (and that the huge image factories focus on model images, as they sell well). That being said, I have a custom made model release that I get signed if I use a model, and counter-signed by a witness. Some models just starting out may be willing to exchange some modelling time for some shots for their portfolio. Of course professional models should be paid for their work and you should expect that. Sometimes your best source of models (especially to begin with) are your friends and family. Discuss potential uses with them so there are no surprises and also get them to sign a release.

      Locations also should sign a property release if it's private land. I know some photographers use locations like schools/cafes/hospitals etc when they are already there on a commercial shoot. They may negotiate a reduced shoot rate in exchange for some time shooting a few images for stock and getting releases signed.

      In short, think local and small to begin with and you may find you have more locations and models available than you first imagined :)

      Reply
  3. Christine
    Christine says:

    Thank you for this! I found it incredibly succinct and useful, just what I was looking for. Explained all the steps clearly and offered the details necessary. I have over 5,000 images and believe there has to be a place for at least a portion of them. With your guidance, I now have a plan to get started. I'll let you know how it goes :) Ah, a question. In your experience, is there an average file size that is desired? I shoot in raw with a Nikon and will submit in jpeg but some of my files are still 50MB. Is there a minimum/maximum file size?

    Reply
    • MicrostockMan
      MicrostockMan says:

      Hi Christine,

      Thanks for the great feedback, glad you found it so helpful. Please note that Shutterstock has reduced their royalties as of June 1st 2020 so that is something to consider.

      As for your question, most agencies limit file size to around 25-30mb. So when you save out your jpg's I would make sure they stay under 25mb to be safe. But just as a reminder, don't confuse file size (mb) with file resolution (mp) as you will want to submit your files in a decent resolution. I usually submit 24 megapixel or bigger if I can.

      All the best with it :)

      Reply
  4. TONY
    TONY says:

    Hi,
    I am new here and would like to sell images that I have accumulated over the years.
    Is it possible to sell the same image to more than one platform? Would this potentially boost the exposure and potential income or otherwise?

    Reply

Leave a Reply

Want to join the discussion?
Feel free to contribute!

Leave a Reply

Your email address will not be published. Required fields are marked *

Show Your Support

Like the article? If you found it helpful, please show your support by purchasing a great stock image from just $5.

We rely on your generosity to continue to provide useful and up to date content for stock contributors.

Image Categories

Click here to add your own text